More flexibility and Improved Isolation using Kata Containers
A commonly used approach to build container images as part of the DevOps pipeline is to use a builder image running in a Kubernetes cluster. The builder image leverages either docker or kaniko or buildah.
With Kata containers maturing into a production-ready container runtime and subsequent increase in uptake, it presents a great potential for improving the hosted build and development environment approach in the following two areas:
- Improved addressing of the noisy neighbor problem — building container image inside one container shouldn’t affect any other container workloads running on the same host.
- Improved isolation — handling unique and privileged requirements (eg. docker-in-docker requiring privileged container) without impacting current host settings or policies.
Think peace of mind for Operations and increased flexibility for the developers at the same time. You continue to use your favorite builder or development images (based on either docker, buildah, or kaniko) but with the added benefits of running this as a Kata container.
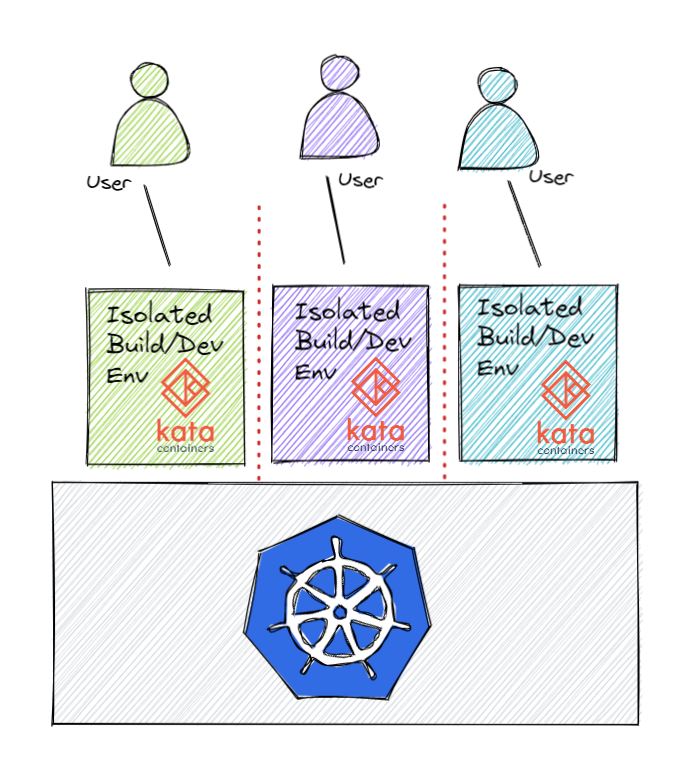
So if you are currently hosting build and development environments on Kubernetes or planning to host one in the future here are some examples to help you get started with exploring Kata containers.
Installation Of Kata Containers in a Kubernetes Cluster
To get started with Kata Containers in a Kubernetes cluster there are some prerequisites to complete.
Prerequisites
- A Kubernetes Cluster bootstrapped and installed with kubeadm, kubectl and kubelet
- Container Runtime Interface (CRI) – containerd or CRI-O
Installation of Kata-Containers
The easiest way to deploy Kata containers in a Kubernetes cluster is via kata-deploy. This will run as a pod inside the kube-system namespace and will install all the binaries and artifacts needed to run Kata containers.
- For this first create different RBAC roles for kata-deploy pod
kubectl apply -f https://raw.githubusercontent.com/kata-containers/kata-containers/main/tools/packaging/kata-deploy/kata-rbac/base/kata-rbac.yaml
- Then create a kata-deploy pod and check it inside the
kube-systemnamespace.
kubectl apply -f https://raw.githubusercontent.com/kata-containers/kata-containers/main/tools/packaging/kata-deploy/kata-deploy/base/kata-deploy-stable.yaml
- Check the kata-deploy pod status
kubectl get pods -n kube-system
kubectl -n kube-system wait --timeout=10m --for=condition=Ready -l name=kata-deploy pod
- Check the Kata-Containers labels on the node
kubectl get nodes --show-labels | grep kata
- After this configure a runtime class for Kata Containers by creating a Kubernetes resource of a
kind:RuntimeClass.
# runtimeclass.yaml
kind: RuntimeClass
apiVersion: node.k8s.io/v1
metadata:
    name: kata-qemu
handler: kata-qemu
overhead:
    podFixed:
        memory: "160Mi"
        cpu: "250m"
scheduling:
  nodeSelector:
    katacontainers.io/kata-runtime: "true"
kubectl apply -f runtimeclass.yaml
- See more information about the
kata-qemuruntime class through
kubectl get runtimeclass
kubectl describe runtimeclass kata-qemu
- Then test the runtime by creating a Nginx pod and using the above runtime class which has the
name:kata-qemu
# nginx-kata.yaml
apiVersion: v1
kind: Pod
metadata:
  name: nginx-kata
spec:
  runtimeClassName: kata-qemu
  containers:
  - name: nginx
    image: nginx
kubectl apply -f nginx-kata.yaml
kubectl get pods
Examples with Kata Containers
The examples below demonstrate the basic building block of using Kata containers for container image building and not a complete solution for hosted development environments on Kubernetes.
Using buildah builder image with vfs
# buildah.yaml
apiVersion: v1
kind: Pod
metadata:
  name: buildah
  namespace: sandboxed-builds
spec:
  runtimeClassName: kata-qemu
  containers:
    - name: buildah
      image: quay.io/buildah/stable:v1.23.1
      command: ["sleep", "infinity"]
kubectl create ns sandboxed-builds
kubectl apply -f buildah.yaml
kubectl get pods -n sandboxed-builds
- Create an example Dockerfile to try out the build step inside the container
kubectl exec buildah -n sandboxed-builds mkdir /build
cat Dockerfile
kubectl cp Dockerfile sandboxed-builds/buildah:/build
- Build the container image with buildah
kubectl exec buildah -n sandboxed-builds -- buildah bud --storage-driver vfs -f /build/Dockerfile .
Using kaniko builder image
- Create a kaniko container in a namespace called
sandboxed-builds
# kaniko.yaml
apiVersion: v1
kind: Pod
metadata:
  name: kaniko
  namespace: sandboxed-builds
spec:
  containers:
  - name: kaniko
    image: gcr.io/kaniko-project/executor:latest
    args:
    - "--context=git://github.com/oshi36/perf-container.git"
    - "--dockerfile=Dockerfile"
    - "--destination=<YOUR_OWN_REGISTRY_PATH>"
    volumeMounts:
    - name: docker-config
      mountPath: /kaniko/.docker/
  volumes:
  - name: docker-config
    secret:
      secretName: docker-regcred
      items:
          - key: .dockerconfigjson
            path: config.json
  restartPolicy: Never
  runtimeClassName: kata-qemu
Create a Kubernetes secret with your Docker credentials to push the image to your docker account and replace <YOUR_OWN_REGISTRY_PATH> with your own Docker registry path.
kubectl create secret docker-registry docker-regcred -n sandboxed-builds \ --docker-username=<YOUR_USERNAME> \ --docker-password=<YOUR_PASSWORD> \--docker-email=<YOUR_EMAILID> \ --docker-server=https://index.docker.io/v1/
kubectl apply -f kaniko.yaml
kubectl get pods -n sandboxed-builds
kubectl logs kaniko -n sandboxed-builds
Using buildah builder image with emptyDir or PersistentVolume and fuse-overlayfs
Using fuse-overlayfs results in better performance compared to vfs and is preferred.
fuse-overlayfs requires /dev/fuse device to be present.
- Create a buildah container with
emptyDirvolume in a namespace calledsandboxed-builds
# buildah-emptydir.yaml
apiVersion: v1
kind: Pod
metadata:
  name: buildah-emptydir
  namespace: sandboxed-builds
spec:
  containers:
    - name: buildah
      image: quay.io/buildah/stable:v1.23.1
      command: ["sh", "-c"]
      args:
      - mknod /dev/fuse -m 0666 c 10 229 && sleep infinity
      securityContext:
        privileged: true
      volumeMounts:
      - mountPath: /var/lib/containers
        name: container-storage
  runtimeClassName: kata-qemu
  volumes:
  - name: container-storage
    emptyDir:
     medium: Memory
kubectl apply -f buildah-emptydir.yaml
kubectl get pods -n sandboxed-builds
- Create an example Dockerfile to try out the build step inside the container.
kubectl exec buildah-emptydir -n sandboxed-builds mkdir /build
kubectl cp Dockerfile sandboxed-builds/buildah-emptydir:/build
- Build the container image.
kubectl exec buildah-emptydir -n sandboxed-builds -- buildah bud -f /build/Dockerfile .
Using docker (DinD) builder image
- Create a DinD container with
emptyDirvolume in a namespace calledsandboxed-builds
# dind.yaml
apiVersion: v1
kind: Pod
metadata:
  name: dind
  namespace: sandboxed-builds
spec:
  containers:
    - name: dind
      image: docker.io/docker:dind
      securityContext:
        privileged: true
      volumeMounts:
      - mountPath: /var/lib/docker
        name: container-storage
  runtimeClassName: kata-qemu
  volumes:
  - name: container-storage
    emptyDir:
     medium: Memory
kubectl apply -f dind.yaml
kubectl get pods -n sandboxed-builds
- Create an example Dockerfile to try out the build step.
kubectl exec dind -n sandboxed-builds mkdir /build
kubectl cp Dockerfile sandboxed-builds/dind:/build
- Build the container image.
kubectl exec dind -n sandboxed-builds -- docker build -f /build/Dockerfile .
If you plan to use memory-backed ephemeral volume, remember that it’s a tmpfs mounted volume using the Kata VM memory. Typically tmpfs volume size is 50% of VM RAM. By default, the tmpfs volumes will be approximately 1G, since the default Kata VM memory is 2G.
You can either increase the default Kata VM memory size as required, or you can use the following approach to create a tmpfs volume of the required size.
you can try out the below two examples by yourself, remember it requires more memory.
The example below shows how to provision ~3G of storage for containers using tmpfs
# build-tmpfs.yaml
apiVersion: v1
kind: Pod
metadata:
  name: buildah-emptydir
  namespace: sandboxed-builds
spec:
  containers:
    - name: buildah
      image: quay.io/buildah/stable:v1.23.1
      command: ["sh", "-c"]
      args:
      - mkdir -p /var/lib/containers &&
        mount -t tmpfs tmpfs /var/lib/containers &&
        mknod /dev/fuse -m 0666 c 10 229 &&
        sleep infinity
      resources:
        limits:
          memory: 6G
      securityContext:
        privileged: true
  runtimeClassName: kata-qemu
There are other configurations described here that you can try for your specific use case.
An alternative approach using a loop-mounted file image instead of an ephemeral or persistent volume provides good performance as well as doesn’t depend on VM memory.
# buildah-loop.yaml
apiVersion: v1
kind: Pod
metadata:
  name: buildah-loop
  namespace: sandboxed-builds
spec:
  runtimeClassName: kata-qemu
  containers:
    - name:  buildah-loop
      image: quay.io/buildah/stable:v1.23.1
      command: ["sh", "-c"]
      args:
      - mknod /dev/loop0 b 7 0 &&
        dnf install -y e2fsprogs &&
        truncate -s 20G /tmp/disk.img &&
        mkfs.ext4 /tmp/disk.img &&
        mkdir -p /var/lib/containers &&
        mount /tmp/disk.img /var/lib/containers &&
        mknod /dev/fuse -m 0666 c 10 229 &&
        sleep infinity
      securityContext:
        privileged: true
Hope this helps to get started with Kata containers for creating hosted build and development environments on Kubernetes.
Conclusion
In this blog, we have seen how to set up Kata containers in a Kubernetes cluster and how to use it to build images inside different image builders.
