GitOps implementation with ArgoCD and FluxCD
Before moving ahead with hands-on, let’s first make sure to have the following things in place:
Pre-requisite:
1. Hope you have access to your personal Github account
2. hope you had generated personal access token PAT key for yourself to access your repositories from your GitHub and store it somewhere (don’t share it with anyone)
3. Fork the below repository to manage infrastructure configuration for argocd
https://github.com/NiniiGit/argocd-demo.git
4. Fork the below application repository
https://github.com/NiniiGit/argocd-demo.git
Check if you’re able to access the lab cluster
kubectl get nodes
ArgoCD :
ArgoCD installation:
Lets create a namespace where we will install ArgoCD.
kubectl create ns argocd
There are different methods available. We will use below:
kubectl -n argocd apply -f https://raw.githubusercontent.com/argoproj/argo-cd/stable/manifests/install.yaml
Lets see if ArgoCD pods have come up or not!
kubectl get pods -n argocd
Let’s download the ArgoCD cli aka client tool.
curl -sSL -o argocd-linux-amd64 https://github.com/argoproj/argo-cd/releases/latest/download/argocd-linux-amd64
sudo install -m 555 argocd-linux-amd64 /usr/local/bin/argocd
rm argocd-linux-amd64
Now to access Argocd UI, execute below command and then click on argocd-ui-app option on right side pane.
argocd admin dashboard --address 0.0.0.0 --port 8085 --namespace argocd
And you would be presented with direct access to ArgoCD console as below. By default, the argocd admin dashboard command does not ask for authentication (for local development, this approach is okay but for actual production usecase, we would follow the practice of exposing argocd as ingress or on loadbalancer to let your teams access it via proper authentication mechanism like LDAP etc ). This means that anyone who has access to the machine where the command is running can access the ArgoCD dashboard without needing to enter a username or password.

(If above command doesn’t work (stating issue that : argocd-cm not found) then, we will use the below workaround of Kubens.kubens is a command-line utility that allows you to switch between Kubernetes namespaces easily. Here are the installation commands for kubens:
1. Download the latest release of the kubectx and kubens utilities from the GitHub repository:
curl -LO https://github.com/ahmetb/kubectx/releases/download/v0.9.4/kubectx_v0.9.4_linux_x86_64.tar.gz
curl -LO https://github.com/ahmetb/kubectx/releases/download/v0.9.4/kubens_v0.9.4_linux_x86_64.tar.gz
2. Extract the downloaded archives:
tar -xzvf kubectx_v0.9.4_linux_x86_64.tar.gz
tar -xzvf kubens_v0.9.4_linux_x86_64.tar.gz
3. Move the kubectx and kubens binaries to a directory in your $PATH, such as /usr/local/bin:
sudo mv kubectx /usr/local/bin/
sudo mv kubens /usr/local/bin/
4. Switch to argocd namespace using below command
kubens argocd
and then run:
argocd admin dashboard --address 0.0.0.0 --port 8085 --namespace argocd
In case you want to expose your app via ingress, you would be presented with login page as shown below,

to which you can login by using default admin user and password that you can access via below way from its secret)
kubectl -n argocd get secret argocd-initial-admin-secret -o jsonpath="{.data.password}" | base64 -d && echo)
Introduction to ArgoCD UI:
The best way to get introduced to ArgoCD UI is by trying it out to deploy any app on your k8s cluster.
Deploy Sample app with ArgoCD UI
Now, let’s deploy one sample app via ArgoCD GUI. We will use the sample application from application repository that I suggested prior as part of prerequisites to fork to your account: podinfo-demo app
https://github.com/<your-github-name>/podinfo-demo.git
Now let’s go back to the ArgoCD console and click on +Create application from application tab and you would be presented with below kind of console. Please add application details like the name you want to give to your app.

and your forked sample app repository as the git source that argocd should deploy and also select the target cluster (in this case, your local cluster)

once you click on create app, you would see below kind of application created, which is deploying your sample app to kubernetes cluster.

click on the deployed app:
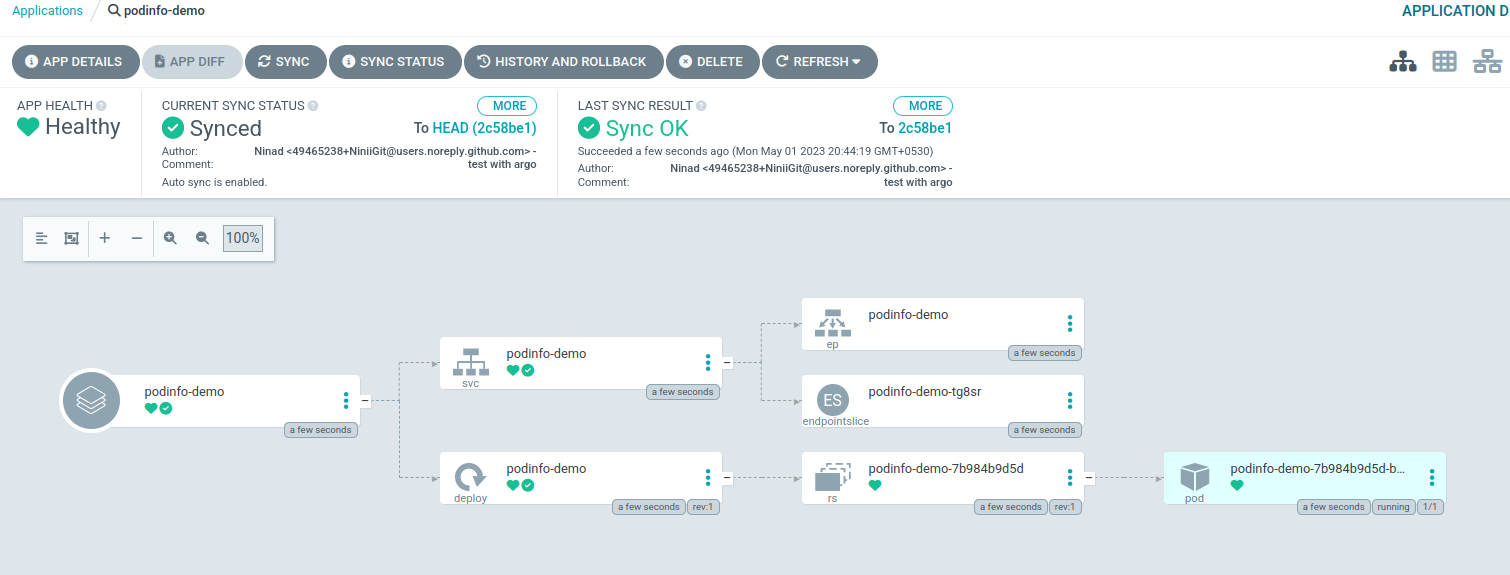
You would see pod getting deployed:

Releasing new changes:
Now, imagine you want to make some changes in app and push those changes, lets play around it:
Let’s clone the app repo first
git clone https://github.com/<you-git-name>/podinfo-demo.git
now lets access and make some config changes using in-build IDE

now let’s make changes to the UI property and also change the version number in the chart.yaml as ArgoCD by default, uses chart version number as detection mechanism before doing reconciliation

Save and push those changes now
git add .
git commit -m "change in foreground color"
git push
and now you would see , ArgoCD detecting changes and pushing them

you would see pod newly created:

Now let’s try to delete the app we deployed earlier from UI itself:

You would see its not anymore present

Declarative setup with ArgoCD:
Okay, so now we saw how to use the ArgoCD via its UI to make things work but in general production use cases, as the first principle of GitOps, we do all this work as well in a declarative style. So let’s try to deploy the same app that we deploy via ArgoCD UI but this time, using YAML files in a declarative way.
Since we are going to work with Github, better lets use Github cli tool gh to make our life easy.
sudo apt install gh
Lets authenticate ourselves
gh auth login
It will ask you to provide details including password(PAT key in this case) as shown below:

git config --global user.email "you@example.com"
git config --global user.name "Your Name"
App of apps pattern:
Now fork the repository: argocd-demo below and clone it as shown below:
git clone https://github.com/<your-git-account>/argocd-demo.git && cd argocd-demo
You would be able to see argocd-demo.yaml file
vim argocd-demo.yaml
You would be able to see below kind of content in commented state:
apiVersion: argoproj.io/v1alpha1
kind: Application
metadata:
  name: argocd-root-app
  namespace: argocd
spec:
  destination:
   # name: kind-gitops-cluster
    namespace: default
    server: https://kubernetes.default.svc
  project: default
  source:
    path: .
    repoURL: https://github.com/<github-username>/argocd-demo.git #https://github.com/argoproj/argocd-example-apps.git
    targetRevision: HEAD
    directory:
      recurse: true
      jsonnet: {}
  project: default
  syncPolicy:
    automated:
      prune: true
      selfHeal: true
Lets uncomment and apply argocd-demo.yaml file by running k apply -f argocd-demo.yaml, which is a way of saying to argocd that: please do monitor repo and deploy whatever is present and will be part of that repo: https://github.com/<your-github-name>/argocd-demo.git .
kubectl apply -f argocd-demo.yaml
Also lets push the updated repo to Git remote repo.
Now lets say I want to deploy same app by declarative style then , for that we have already created podinfo-demo-argo.yaml file inside cloned repo but which is in commented stated. Lets deploy by uncommenting the same and you would see, argo creating it again
vim podinfo-demo-argo.yaml
apiVersion: argoproj.io/v1alpha1
kind: Application
metadata:
  name: podinfo-demo
  namespace: argocd
spec:
  destination:
    server: https://kubernetes.default.svc
    namespace: default
  project: default
  source:
    helm:
      valueFiles:
      - values.yaml
    path: ./charts/podinfo
    repoURL: https://github.com/NiniiGit/podinfo-demo.git
    targetRevision: HEAD
  syncPolicy:
    automated:
      prune: true
      selfHeal: true
after uncommenting it, save it and then push the change to git repository again, so Argocd can detect a valid YAML object to target cluster.
git add .
git commit -m "sample podinfo app with argocd"
git push
Promote releases between environments
Take a look at our previously forked sample podinfo app repository https://github.com/NiniiGit/podinfo-demo/tree/master/charts/podinfo/custom-values as it contain separate (consider custom) values.yaml file present inside staging and production sub-folders created for managing staging and production-related helm chart configuration respectively
Now since we have learned a bit about how to use ArgoCD declaratively, lets understand how we can promote changes that we (suppose) tested in staging and now want to promote to productions.
Assumption: We are having multi-tenant application here, which is deployed in separate namespaces. For example, the staging application is deployed in the staging namespace and production application is deployed in the production namespace.
p.s: Make sure you’re still inside the locally downloaded podinfo-demo.git repository itself before doing this task, as we would be pushing argo application files for staging and production in the same git repo, which argo is already managing
So, lets create two separate namespaces for the same.
k create ns staging
k create ns production
now lets podinfo app to be deploy in staging namespace
vim staging-pod-info.yaml
Please take a look at valuesFiles: parameter in the below file which is specifically pointing to custom values.yaml file which is (hypothetically)specific to staging ecosystem
apiVersion: argoproj.io/v1alpha1
kind: Application
metadata:
  name: podinfo-demo-staging
  namespace: argocd
spec:
  destination:
    server: https://kubernetes.default.svc
    namespace: staging
  project: default
  source:
    helm:
      valueFiles:
      - custom-values/staging/values.yaml
    path: ./charts/podinfo
    repoURL: https://github.com/<your-github-name>/podinfo-demo.git
    targetRevision: HEAD
  syncPolicy:
    automated:
      prune: true
      selfHeal: true
git add . git commit -m "app deployment to staging" git push
let’s see if our app is deployed in the staging namespace or not.
k get all -n staging
now let’s deploy the app in the production namespace too. Lets create the argocd application file for production
vim production-pod-info.yaml
Please take a look at valuesFiles: parameter in the below file which is specifically pointing to custom values.yaml file which is (hypothetically)specific to production ecosystem
apiVersion: argoproj.io/v1alpha1
kind: Application
metadata:
  name: podinfo-demo-production
  namespace: argocd
spec:
  destination:
    server: https://kubernetes.default.svc
    namespace: production
  project: default
  source:
    helm:
      valueFiles:
      - custom-values/production/values.yaml
    path: ./charts/podinfo
    repoURL: https://github.com/<your-github-name>/podinfo-demo.git
    targetRevision: HEAD
  syncPolicy:
    automated:
      prune: true
      selfHeal: true
      syncWave:
        interval: 1m
git add . git commit -m "app deployment in production" git push
lets see if our app is deployed or not
k get all -n production
now let’s say, I want to promote this change from staging to prod, I would just simply copy values.yaml file from ../custom-values/staging/ to ../custom-values/production/ folder of my application repo: podinfo-demo and then Argocd take care of the rest.
git clone https://github.com/NiniiGit/podinfo-demo.git && cd podinfo-demo/charts/podinfo/
cp custom-values/staging/values.yaml custom-values/production/values.yaml
ArgoCD by default, uses chart version number as detection mechanism before doing reconciliation , so lets update chart version number as well now to anything of your choice.
apiVersion: v1
version: 6.3.4
appVersion: 6.3.4
name: podinfo
engine: gotpl
description: Podinfo Helm chart for Kubernetes
home: https://github.com/stefanprodan/podinfo
maintainers:
- email: stefanprodan@users.noreply.github.com
  name: stefanprodan
sources:
- https://github.com/stefanprodan/podinfo
kubeVersion: ">=1.23.0-0"
now lets commit and push the changes:
git add .
git commit -m "prod upgrade"
git push
Now, let’s watch if ArgoCD is able to detect the changes and recreate the pod in production.
ArgoCD to manage ArgoCD itself:
So we have learned by now, how ArgoCD can manage deployment, and upgrades of all the apps that it manages, but what if tomorrow, I want to upgrade by ArgoCD itself without any manual efforts and in a declarative style?
ArgoCD recommends you use Kustomization as a way to handle it effectively:
all that you would need to do is : create Kustomization.yaml file and push it to your repository, which is being managed by ArgoCD and let it be aware of what resources it needs to manage:
git clone https://github.com/NiniiGit/argocd-demo.git && cd argocd-demo
apiVersion: kustomize.config.k8s.io/v1beta1
kind: Kustomization

namespace: argocd

resources:
  - argocd-demo.yaml
  - https://raw.githubusercontent.com/argoproj/argo-cd/stable/manifests/install.yaml
copy above conent into below file and save it.
vim kustomization.yaml
Push this file to the repository being managed by ArgoCD.
git add .
git commit -m "self-managed argocd"
git push
Wait for a few mins and you would see your root ArgooCD app managing itself.

Cleanup of ArgoCD installation::
now lets clean the entire setup by running below command :
kubectl -n argocd delete -f https://raw.githubusercontent.com/argoproj/argo-cd/stable/manifests/install.yaml
FluxCD:
FluxCD installation:
Now, since we have understood how ArgoCD handles GitOps, lets look at another popular tool called FluxCD by Weavework, who were the actual inventor of term GitOps and GitOps philosophy!
# Replace `[...]` with the GitHub organization or a GitHub user f it is a personal account
export GITHUB_ORG=[...]
# Replace `[...]` with `true` if it is a personal account, orwith `false` if it is an GitHub organization
export GITHUB_PERSONAL=[...]
lets install flux client utility first.
curl -s https://fluxcd.io/install.sh | sudo bash
flux bootstrap github --owner $GITHUB_ORG --repository flux-system --branch main --path apps --personal $GITHUB_PERSONAL
kubectl --namespace flux-system get pods
Now, most of the time, people including me were wishing that they should have provided UI and so finally looking at increasing user demand around it, they have created a new project called : Weave GitOps for the same. So lets deploy the same using instructions as shown below:
Introduction to FluxCD/WeaveGitOps UI:
Install GitOps cli
Weave GitOps includes a command-line interface to help users create and manage resources.
curl --silent --location "https://github.com/weaveworks/weave-gitops/releases/download/v0.22.0/gitops-$(uname)-$(uname -m).tar.gz" | tar xz -C /tmp
sudo mv /tmp/gitops /usr/local/bin
gitops version
Deploy Weave GitOps UI
Lets make sure we are in the same repository as of which, we used to bootstrap fluxCD i.e our repository called flux-system
PASSWORD="<your password>"
gitops create dashboard ww-gitops --password=$PASSWORD --export > weave-gitops-dashboard.yaml
Now, lets commit and push this weave-gitops-dashboard.yaml to the remote repository fleet-system repository, which is being monitored by FluxCD
git add -A && git commit -m "Add Weave GitOps Dashboard"
git push
lets validate if Weave GitOps dashboard got deployed in flux-system namespace or not
kubectl get pods -n flux-system
Now, let’s access its UI by port-forwarding it to port 9001 on localhost.
kubectl port-forward --address 0.0.0.0 svc/ww-gitops-weave-gitops -n flux-system 9001:9001
and then click on weave-gitops-apps option on UI, and you would see below kind of UI:

and now login to it using admin as username and password that you earlier pass via $PASSWORD var.

So now you can execute operations similar to how you do it for ArgoCD but on the FluxCD side too.
Deploy Sample app with FluxCD
Creating FluxCD resources
Lets clone the remote repository and get inside it
git clone https://github.com/$GITHUB_ORG/flux-system.git && cd flux-system
ls -l apps/flux-system
cd apps
Now , lets create podinfo-demo-fluxcd.yaml file and add below content:
vim podinfo-demo-fluxcd.yaml
Copy below content in it:
apiVersion: source.toolkit.fluxcd.io/v1
kind: GitRepository
metadata:
  name: podinfo-demo
  namespace: flux-system
spec:
  interval: 10s
  ref:
    branch: master
  url: https://github.com/NiniiGit/podinfo-demo.git
---
apiVersion: helm.toolkit.fluxcd.io/v2beta1
kind: HelmRelease
metadata:
  name: podinfo-demo
  namespace: flux-system
spec:
  chart:
    spec:
      chart: ./charts/podinfo
      reconcileStrategy: ChartVersion
      sourceRef:
        kind: GitRepository
        name: podinfo-demo
  interval: 10s
  targetNamespace: default
Now lets push this file to this repo itself.
git add .
git commit -m "GitOps with fluxCD"
git push
Now, wait for few seconds and you would be able to see that: FluxCD detected new changes to repository and pushed it to our cluster to match actual state with desired state inside cluster.

Releasing new changes:
Now, imagine you want to make some changes in app and push those changes, lets play around it:
Let’s clone the app repo first
git clone https://github.com/NiniiGit/podinfo-demo.git
now let’s access and make some config changes using the in-build IDE.

now let’s make changes to the UI property and importantly also make change in version: number from Chart.yaml file since we are using reconcileStrategy: ChartVersion

Save and push those changes now.
git add .
git commit -m "change in foreground color"
git push
and now you would see, FluxCD detecting changes and pushing them.

Now let’s try to delete the FluxCD-related resources, we deployed earlier:
cd ../flux-system/apps/
rm -rf podinfo-demo-fluxcd.yaml
git add .
git commit -m "removed sample helm chart releasefile"
git push
You would see it deleted the deployed pod etc

Promote releases between environments
Now, since we have learned a bit about how to use FluxCD declaratively, let’s understand how we can promote changes that we (suppose) tested in staging and now want to promote to productions.
Assumption: We are having multi-tenant application here, which is deployed in separate namespaces. For example, the staging application is deployed in the staging namespace and production application is deployed in the production namespace.
So, let’s create two separate namespaces for the same.
k create ns staging
k create ns production
Now let’s create an FluxCD related file which will deploy our staging app in staging namespaces. Lets go back to flux-system git repo that we have cloned already.
cd /root/flux-system/apps
vim staging-pod-info.yaml
apiVersion: source.toolkit.fluxcd.io/v1
kind: GitRepository
metadata:
  name: podinfo-demo
  namespace: flux-system
spec:
  interval: 10s
  ref:
    branch: master
  url: https://github.com/NiniiGit/podinfo-demo.git
---
apiVersion: helm.toolkit.fluxcd.io/v2beta1
kind: HelmRelease
metadata:
  name: podinfo-demo-staging
  namespace: flux-system
spec:
  chart:
    spec:
      chart: ./charts/podinfo
      reconcileStrategy: Revision
      sourceRef:
        kind: GitRepository
        name: podinfo-demo
      valuesFiles:
       - charts/podinfo/custom-values/staging/values.yaml
  interval: 10s
  targetNamespace: staging
let’s deploy this application file
git add .
git commit -m "app dpeloyment to staging"
git push
let’s check if our app got deployed:
k get all -n staging
Now let’s create a similar FluxCD application file which will deploy our app in production namespaces
vim production-pod-info.yaml
apiVersion: source.toolkit.fluxcd.io/v1
kind: GitRepository
metadata:
  name: podinfo-demo-prod
  namespace: flux-system
spec:
  interval: 10s
  ref:
    branch: master
  url: https://github.com/NiniiGit/podinfo-demo.git
---
apiVersion: helm.toolkit.fluxcd.io/v2beta1
kind: HelmRelease
metadata:
  name: podinfo-demo-production
  namespace: flux-system
spec:
  chart:
    spec:
      chart: ./charts/podinfo
      reconcileStrategy: Revision
      sourceRef:
        kind: GitRepository
        name: podinfo-demo
      valuesFiles:
       - charts/podinfo/custom-values/production/values.yaml
  interval: 10s
  targetNamespace: production
let’s apply the same.
git add .
git commit -m "app dpeloyment to production"
git push
let’s check if our app got deployed:
k get all -n production
now let’s say, I want to promote this change from staging to prod, I would just simply copy values.yaml file from ../custom-values/staging/ to ../custom-values/production/ folder of my application repo: podinfo-demo and then Argocd take care of the rest.
git clone https://github.com/NiniiGit/podinfo-demo.git && cd podinfo-demo/charts/podinfo/
cp charts/podinfo/custom-values/staging/values.yaml charts/podinfo/custom-values/production/values.yaml
git add .
git commit -m "staging to production release promotion"
git push
Now, let’s watch if FluxCD is able to detect the changes and recreate the pod in production.
k get pods -n production -w
Now, most of the time, people including me were wishing that they should have provided UI and so finally looking at increasing user demand around it, they have created a new project called : Weave GitOps for the same. So lets deploy the same using instructions as shown below:
Install GitOps cli
Weave GitOps includes a command-line interface to help users create and manage resources.
curl --silent --location "https://github.com/weaveworks/weave-gitops/releases/download/v0.22.0/gitops-$(uname)-$(uname -m).tar.gz" | tar xz -C /tmp
sudo mv /tmp/gitops /usr/local/bin
gitops version
Deploy Weave GitOps UI
Lets make sure we are in the same repository as of which, we used to bootstrap fluxCD i.e our repository called flux-system
PASSWORD="<your password>"
gitops create dashboard ww-gitops --password=$PASSWORD --export > weave-gitops-dashboard.yaml
Now, lets commit and push this weave-gitops-dashboard.yaml to the remote repository fleet-system repository, which is being monitored by FluxCD
git add -A && git commit -m "Add Weave GitOps Dashboard"
git push
lets validate if Weave GitOps dashboard got deployed in flux-system namespace or not
kubectl get pods -n flux-system
Now, let’s access its UI by port-forwarding it to port 9000 on localhost.
kubectl port-forward --address 0.0.0.0 svc/ww-gitops-weave-gitops -n flux-system 9001:9001
and then click on weave-gitops-apps option on UI, and you would see below kind of UI:

and now login to it using admin as username and password that you earlier pass via $PASSWORD var

So now you can execute operations similar to how you do it for ArgoCD but on the FluxCD side too.
Cleanup of FluxCD installation:
let’s clean up this all.
flux uninstall --namespace=flux-system
Hope you all enjoyed so far learnings we were able to cover up as part of the GitOps 101 session. In case of any doubts or further query, don’t hesitate to reach out to me on LinkedIn or twitter as would be happy to help!
Keep learning, keep growing!!
