In today’s cloud-driven world, managing sensitive information such as API keys, passwords, and connection strings securely is crucial to ensure the security and reliability of your applications. Azure Key Vault offers a robust, centralized solution for managing secrets, encryption keys, and certificates.

In this guide, we will explore how to manage secrets in Azure using Azure Key Vault and why it’s an essential tool for developers and administrators alike.
What is a key-vault resource in azure?
Azure Key Vault is a cloud service provided by Microsoft Azure that securely stores and manages sensitive information such as secrets, encryption keys, certificates, and passwords. It helps enhance security by providing a central location for managing access to sensitive data and controlling permissions, minimizing the chances of data breaches.
Features of Azure Key vault
- Improved Security: Keeps sensitive data secure by limiting access to authorized users and applications. Key Vault uses hardware security modules to protect cryptographic keys.
- Simplified Key Management: Centralized control and lifecycle management of keys, secrets, and certificates.
- Compliance: Helps meet regulatory requirements by securely managing encryption keys and logging access to sensitive data.
Benefits of Azure Key Vault
- Secrets Management: Securely stores and manages passwords, API keys, and sensitive data.
- Key Management: Creates and manages encryption keys for securing data at rest and in transit.
- Certificate Management: Automates SSL/TLS certificate provisioning and renewal.
- Secure Access & Auditing: Enforces access control policies and provides logging for audit trails.
- Integration with Azure Services: Works seamlessly with Azure services like AKS, App Service, and Functions for secret and key management.
Implementation of managing secrets in azure
The first step in managing secrets in Azure is creating a Key Vault. We can do this either through the Azure Portal or by using the Azure CLI.
Create a key vault using azure CLI
Run the following command to create a secret. Follow our previous blog “Setup K8s cluster on Azure” to create a resource group.
az keyvault create --resource-group $RESOURCE_GROUP --name $KEYVAULTNAME --location $LOCATION
Once our Key Vault is created, we can start adding secrets, keys, and certificates.
Add a secret to azure key-vault
To add secrets such as API keys, passwords, or database connection strings, we can use the Azure CLI or the Azure Portal.
az keyvault secret set --vault-name $KEYVAULTNAME --name TEXT1 --value Customer1_Company
This command stores our secret (Customer1_Company) under the name TEXT1 in our Key Vault. We can verify from the portal.
Retrieve Secrets
Applications or users with the necessary permissions can retrieve the secrets securely.
Using Azure CLI
az keyvault secret show --vault-name $KEYVAULTNAME --name "TEXT1"
How to Integrate Azure Key Vault with AKS cluster?
We have our key vault ready. Now we need to connect this key vault with the cluster.
Create an AKS Cluster with secret provider
Run the following command to create a cluster and enable azure-keyvault-secrets-provider.
az aks create \
  --resource-group $RESOURCE_GROUP  \
  --name $CLUSTER_NAME\
  --node-count 2 \
  --node-vm-size $INSTANCE_TYPE \
  --location $LOCATION \
  --enable-addons monitoring,azure-keyvault-secrets-provider \
  --enable-managed-identity \
  --load-balancer-sku standard \
  --generate-ssh-keys
Enable azure-keyvault-secrets-provider with existing cluster.
Run the following command:
az aks enable-addons \
  --addons azure-keyvault-secrets-provider \
  --resource-group $RESOURCE_GROUP \
  --name $CLUSTER_NAME
To verify csi-driver and secrets-providers are present in our cluster,
Kubectl get pods -n kube-system
Now our cluster is ready to connect to the key vault.
Create a service connection in AKS with Service Connector
- Navigate to your AKS cluster resource.
- From the service menu, under Settings, select Service Connector (Preview) > Create.
- On the Create connection page, configure the following settings in the Basics tab:
- Kubernetes namespace: Select default.
- Service type: Select Key Vault and select the checkbox to enable the Azure Key Vault CSI Provider.
- Connection name: Enter a name for the connection.
- Subscription: Select the subscription that contains the key vault.
- Key vault: Select the key vault you created.
- Client type: Select None.
- Select Review + create, and then select Create to create the connection.
After creating a service connector you should wait for sometime. It may take 1 to 2 minutes. Navigate key Vault service type. We will get required IDs.
Use this tenant-id, client id in the secret provider class yaml.
Alternate way to get client id: Search from the bar “azurekeyvaultsecret provider——-” as an enterprise application to get appid for secretprovider yaml.
This application Id will be used as a client Id in secret provider class. Let’s understand the secret provider class a bit.
What is a secret provider class?
In the context of Azure Key Vault and Kubernetes, a SecretProviderClass is a Custom Resource Definition (CRD) that is used with the Azure Key Vault Provider for the Kubernetes Secrets Store CSI Driver. The CSI (Container Storage Interface) driver allows Kubernetes applications to securely retrieve secrets, keys, and certificates from Azure Key Vault and mount them as volumes within the pods.
The SecretProviderClass defines the configuration for how the secrets stored in Azure Key Vault will be accessed and consumed by the Kubernetes pods. It specifies details such as the Azure Key Vault name, the type of secret (e.g., key, secret, certificate), and how the secrets should be mapped inside the Kubernetes environment.
Why is SecretProviderClass Required?
- Securely Accessing Secrets: It provides a secure way to pull sensitive data (secrets, keys, certificates) from Azure Key Vault without hardcoding them into configuration files or environment variables in Kubernetes.
- Dynamic Secrets Management: The CSI driver enables dynamic updates. When secrets in Azure Key Vault are updated, they are automatically synced and updated in the Kubernetes pods without needing to redeploy or restart the pods.
- Separation of Secrets: It separates the secret management from application deployment, providing a clean and secure method to inject secrets at runtime.
- Automation: Kubernetes clusters can use SecretProviderClass to automatically inject secrets into the running containers, improving DevOps processes.
How to add the key vault secret as k8s secret?
There are two primary methods to integrate Azure Key Vault secrets into Kubernetes as Kubernetes Secrets:
- Using Azure Key Vault Provider for Secrets Store CSI Driver (Recommended).
- Manually pulling the secret and creating a Kubernetes secret.
We will see how to achieve this in the next section.
Integrating Azure Key Vault Secrets into an RSVP Application
In this example, we will change the values of ENV variables used in the application. first, we will add secrets to the azure key vault.
You can add secrets from azure portal or Run the following commands to set the secrets in azure key vault,
az keyvault secret set --vault-name $KEYVAULTNAME --name TEXT1 --value Customer1_Company
az keyvault secret set --vault-name $KEYVAULTNAME --name TEXT2 --value Welcomes You
az keyvault secret set --vault-name $KEYVAULTNAME --name COMPANY --value Customer1 Company Technology Pvt. Ltd.
Next, we’ll Retrieve secrets TEXT1, TEXT2, COMPANY from the key vault and use them in the application.
Copy all the files from the Source Code in the current directory and apply mongo-db as a backend for RSVP application,
$ kubectl apply -f backend.yaml
Apply default frontend for RSVP application,
$ kubectl apply -f default-frontend.yaml
Now, list the services.
$ kubectl get svc
Run the application using External-IP of Load Balancer service.
Next, apply the SecretProviderClass, which enables Kubernetes pods to securely access and consume secrets stored in Azure Key Vault.
$ kubectl apply -f service-provider-class.yaml
Now, apply frontend.yaml file that contains the secrets from the key vault.
$ kubectl apply -f frontend.yaml
Now, list the services.
$ kubectl get svc
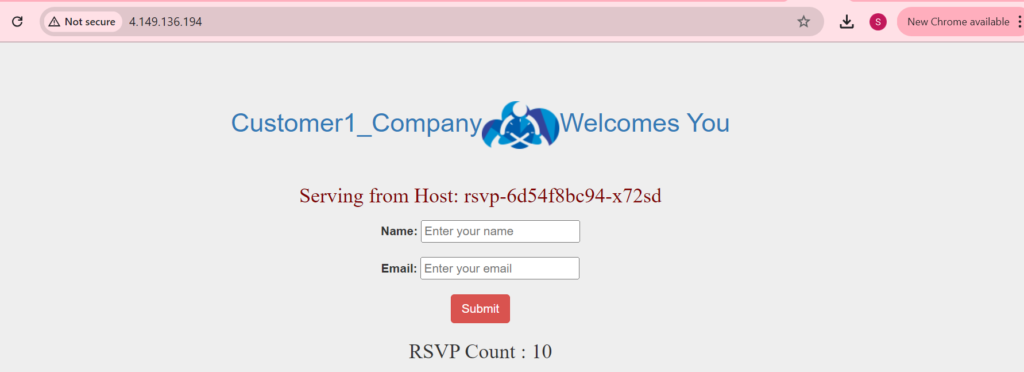
Open the browser and use EXTERNAL-IP of Load Balancer service to view the application.

We can see the secrets are extracted from the key vault and reflected in the application.
Best Practices for Managing Secrets in Azure
We need to follow some best practices to manage secrets efficiently.
- Use Access Policies: Always define specific access policies that give only the minimum permissions required.
- Automate Secret Rotation: Regularly rotate your secrets to reduce the risk of accidental exposure.
- Enable Logging and Monitoring: Use Azure Monitor and enable logs in Key Vault to audit access and changes.
- Avoid Hardcoding Secrets: Never hardcode secrets directly into your application code or configuration files. Use environment variables or secret management tools like Azure Key Vault.
- Backup Secrets: Regularly back up your Key Vault secrets, keys, and certificates for disaster recovery.
Conclusion
Managing secrets effectively is critical to securing modern cloud applications. Azure Key Vault provides a secure, scalable, and easily integrated solution to handle sensitive data like passwords, API keys, and encryption keys. By following best practices such as automating secret rotation, enforcing strict access policies, and integrating Key Vault with other Azure services, you can ensure that your application remains secure.

