To know about the building blocks for containers and container runtimes
Nowadays containers are becoming the default choice to deploy applications. Containers are created using Containers Runtimes like Containerd, cri-o, Docker, etc. We run our applications in an isolated environment such that applications have their own independent identity like hostname, IP Address, etc. In this hands-on lab, we are going to explore Container Runtimes.
In Operating Systems like Linux and Windows, we have features like Cgroups and Namespaces; which enable containerization.
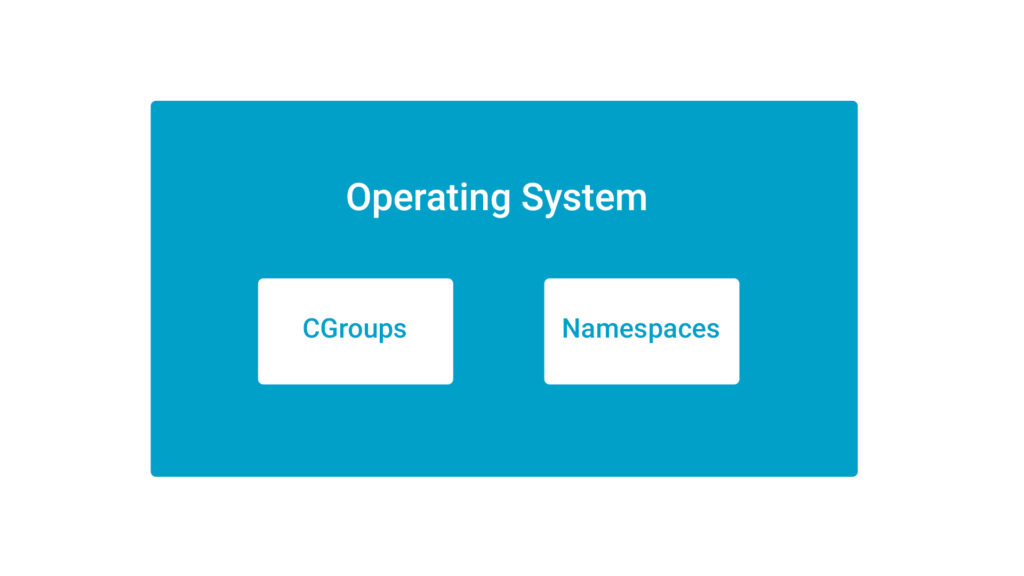
Cgroups
- Control Groups (cgroups) provide a mechanism to organize processes hierarchically and impose limits on how much resources they can use.
- Cgroups are used for resource allocation like the container is going to have 1 CPU and 2 GB of RAM.
- In simple terms, think of Cgroups as something which defines “how much to use”.
Namespaces
- Namespaces allow us to create isolated environments for the containers like the container is going to have its IP address and its hostname.
- This creates an illusion of a process running in the namespace that they have the resources all by themselves.
- Namespaces allow us to abstract global system resources such as network interfaces (net) or mount points (mnt).
- In simple terms, think of NameSpaces as something which defines “what to use”.
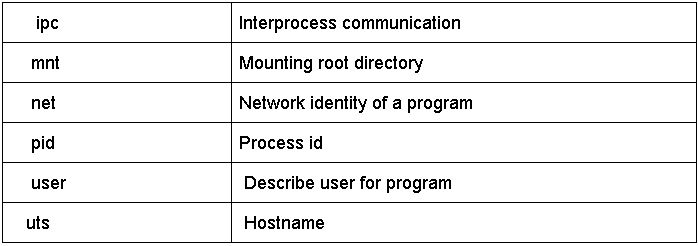
- In Linux, we have six namespaces which are:
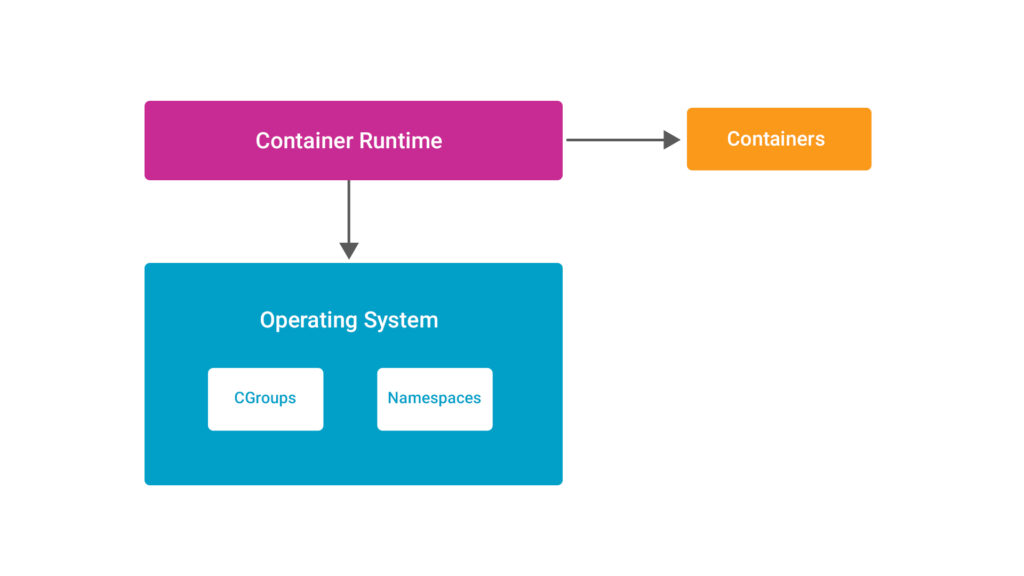
Container Runtimes
Namespaces and Cgroups both have been in existence for a long time and they are being related to containers because these features of Linux Kernels helps to create containers which is not an easy process. Hence, Container Runtimes act as the middleware software to save us and facilitate the easy creation of containers. They use these complex kernel features to create ready-to-deploy containers which can be easily understood by the diagram below
The container runtime is responsible for the following:
- Consuming the container mount point provided by the Container Engine
- Consuming the container metadata provided by the Container Engine
- Communicating with the kernel to start containerized processes
As we know, container runtimes use OS features but to avoid vendor locking and other companies from making their container runtime, a group of IT companies came together and formed an open governance structure, called The Open Container Initiative, under The Linux Foundation.
Open Container Initiative (OCI) and runC
The governance body came up with specifications to create standards on the Operating System processes and application containers. When OCI was created, Docker donated the libcontainer code and turned it into a standalone utility called runC. Now, runC is the reference implementation and used by other Container Engines.
- runC is the CLI tool for spawning and running containers according to these specifications.
- runC has a very short utility and expects a mount point (directory) and meta-data (config.json) to be provided to it.
- runC also helps in running applications packaged according to the Open Container Initiative (OCI) format and compliant with the Open Container Initiative specification.
Implementation of runC
To install runC on the system use the apt install runc command
apt update
apt install runc -y
- To check runC is installed on the system using
runccommand
runc
- Now to run the container with runC, we need an image. So for this, we will be using debootstrap, which is a tool that will install a Debian-based system into a subdirectory of another, already-installed system through the
sudo apt install debootstrapcommand
sudo apt install debootstrap -y
- Then create a new
/mnt/chroot-ubuntu-trustydirectory
sudo mkdir /mnt/
sudo mkdir /mnt/chroot-ubuntu-trusty
- Then with the help of debootstrap, install a Ubuntu distribution in the new directory created earlier with the following command.
cd /mnt/chroot-ubuntu-trusty
sudo debootstrap trusty /mnt/chroot-ubuntu-trusty http://archive.ubuntu.com/ubuntu/
- Now go to the
/mnt/directory we created earlier.
cd /mnt/
- As we got the image now make a sample spec to run the containers using the
runc speccommand
runc spec
After running this, we will get a config.json file in the current directory alongwith chroot-ubuntu-trustydirectory, which helps to create the container which can be seen through the ls command.
ls
- This
config.jsonfile has the information about configurations to run the containers like oci version, os architecture, etc. - Edit the
config.jsonfile through nano/vim editor, currently in the‘root’section‘path’has a value of‘rootfs’which indicates the image location but here we have the image in the‘chroot-ubuntu-trusty’location. - Replace the
‘rootfs’with‘chroot-ubuntu-trusty’
{
	"ociVersion": "1.0.2-dev",
	"process": {
		"terminal": true,
		"user": {
			"uid": 0,
			"gid": 0
		},
		"args": [
			"sh"
		],
	}, .......
	"root": {
		"path": "rootfs",   # replace "rootfs" with "chroot-ubuntu-trusty"
		"readonly": true
	},
	"hostname": "runc",
	"mounts": [
.........- Then run a container with
runccommand
runc run myc
Here myc is the name of the container and you can give any other name also of your choice. runC will find the config.json file and it will create the container with myc name which will run a shell program in it and open a shell for us and we cancome out of this container through exit command.

- In the
config.jsonfile, we can also change the‘args’to‘date’which is currently‘sh’to get the current date when the container runs.
- On saving the changes and running the container again, it shows the current date instead of the shell program.
runc run myc

Conclusion
In this blog, we have seen the building blocks of containers and learned about container runtimes with OCI specification and implemented runc.
