Introduction to Kyverno and exploring some of its security policies for Kubernetes
In recent times, Kubernetes has become the default standard to manage the containers at scale. It can be configured and installed in N different ways which are good in terms of flexibility but can be a nightmare to configure security. If security is not configured in the right way then we may have to pay the heavy price for the breach.
To make it secure by default, irrespective of the deployed environment, security policies come to the rescue, like pod security policy. These policies enforce rules and conditions on the deploying applications. Tools like OPA(Open Policy Agent) and Kyverno can help us deploy such policies.
OPA (Open Policy Agent) is an open-source, general-purpose policy engine that uses a high-level declarative language (REGO) which has a steep learning curve.
On the other hand, Kyverno(Greek for “govern”) is an open-source policy engine natively for Kubernetes, and policies are written in YAML as Kubernetes resources for keeping things simple.It also comes with Kyverno CLI for testing policies. Kyverno is used to simplify validating and/or enforcing best practices for configurations in Kubernetes clusters.
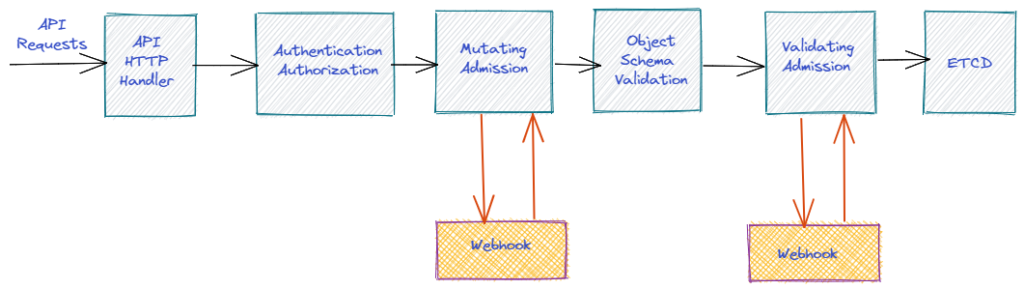
A Quick Intro on Admission Controller
An admission controller is a piece of code that intercepts requests to the Kubernetes API server before the persistence(storing in ETCD) of the object, but after the request is authenticated and authorized(RBAC). It can be regarded as checkpoints for Kubernetes API requests and can completely deny/accept the requests or change the request object altogether.
Kubernetes also has some Dynamic Admission Controllers like ValidatingAdmissionWebhooks and MutatingAdmissionWebhooks, which can validate and mutate the requests sent by the user.
The following diagram below shows how the admission controller works after authorization/authentication and before persisting it to etcd.
As Kubernetes Admission Controller helps to inspect, validate or mutate API requests but writing a custom admission controller sometimes can be tricky so policy engines are introduced for it.
For more information, you can explore the Kubernetes Documentation.
Working of Kyverno Policies
Kyverno is used for dynamic admission controllers in the Kubernetes cluster and receives validating and mutating admission webhook HTTP callbacks from the kube-apiserver and applies matching policies to return results that enforce admission policies or reject requests.
Kyverno policies can match resources using the resource kind, name, and label selectors.
The below image clearly shows that the Webhook handles AdmissionReview requests from the Kubernetes API server and its Monitor component create and manage required configurations. The PolicyController watches policy resources and initiates background scans based on the configured scan interval. The GenerateController manages the lifecycle of generated resources.

Mutating policies can be written as overlays JSON Patch and conditional logic (if-then-else). Validating policies also use an overlay style syntax, with support for pattern matching processing.
Before seeing the implementation of both webhooks, let’s see how to define it inside the policy.

Lab with Kyverno
Installation of Kyverno
- Kyverno can be installed either by using Helm chart or through kubectl. We will be using kubectl to install it.
kubectl create -f https://raw.githubusercontent.com/kyverno/kyverno/release-1.5/definitions/release/install.yaml
This will make kyverno run as a pod inside the Kubernetes cluster under the kyverno namespace
- Get more information about kyverno inside the cluster with the help of pods under namespace
kyverno
kubectl get pods -n kyverno
- To know the kyverno pod configurations
kubectl describe pod -l app=kyverno -n kyverno
- To see about dynamic admission controllers
kubectl get validatingwebhookconfigurations
kubectl get mutatingwebhookconfigurations
Example One
To validate for labels on pod resources which will check for labels and if labels are not present while creating the pod then it will throw the error message.
# require-labels.yaml
# Policy reference: https://kyverno.io/policies/best-practices/require_labels/require_labels/

apiVersion: kyverno.io/v1
kind: ClusterPolicy
metadata:
  name: require-labels
spec:
  validationFailureAction: enforce
  rules:
  - name: check-for-labels
    match:
      resources:
        kinds:
        - Pod
    validate:
      message: "label 'development' is required"
      pattern:
        metadata:
          labels:
            development: "?*"
The policy attribute validationFailureAction is set to enforce to block non-compliant API requests but by using the default value audit it will report violations but not block requests.
Apply the yaml file
kubectl apply -f require-labels.yaml
Different cluster policies can be seen by running and
kubectl get clusterpolicies
Now check the policy by creating the pod
kubectl run nginx --image=nginx
After running this, an error will occur with the message provided in the policy.
Again run the same command by providing the labels.
kubectl run nginx --image=nginx --labels development=yes
To clean the cluster policies
kubectl delete cpol --all
And here cpol is the short name for clusterpolicies
Example Two
To disallow pods to get created in the default namespace and validate it.
# disallow_default_namespace.yaml
# Policy reference: https://kyverno.io/policies/best-practices/disallow_default_namespace/disallow_default_namespace/

apiVersion: kyverno.io/v1
kind: ClusterPolicy
metadata:
  name: disallow-default-namespace
spec:
  validationFailureAction: enforce
  rules:
  - name: validate-namespace
    match:
      resources:
        kinds:
        - Pod
    validate:
      message: "Using 'default' namespace is not allowed."
      pattern:
        metadata:
          namespace: "!default"
  - name: require-namespace
    match:
      resources:
        kinds:
        - Pod
    validate:
      message: "A namespace is required."
      pattern:
        metadata:
          namespace: "?*"
  - name: validate-podcontroller-namespace
    match:
      resources:
        kinds:
        - DaemonSet
        - Deployment
        - Job
        - StatefulSet
    validate:
      message: "Using 'default' namespace is not allowed for pod controllers."
      pattern:
        metadata:
          namespace: "!default"
  - name: require-podcontroller-namespace
    match:
      resources:
        kinds:
        - DaemonSet
        - Deployment
        - Job
        - StatefulSet
    validate:
      message: "A namespace is required for pod controllers."
      pattern:
        metadata:
          namespace: "?*"
Apply the yaml file
kubectl apply -f disallow_default_namespace.yaml
Then create a pod in the default namespace to test policy.
kubectl run alpine --image=alpine
This will give an error as we create the pod in the default namespace.
Again run the same command by specifying another namespace
kubectl create ns test
kubectl run alpine --image=alpine --namespace=test
Clean the cluster policies
kubectl delete cpol --all
Example Three
To configure a mutate policy of kind ClusterPolicy and add labels such as color:blue on pods and other resources creation.
# labels.yaml
# Policy reference:https://kyverno.io/policies/other/add_labels/add_labels/

apiVersion: kyverno.io/v1
kind: ClusterPolicy
metadata:
  name: add-labels
spec:
  validationFailureAction: enforce
  rules:
  - name: add-labels
    match:
      resources:
        kinds:
        - Pod
        - Service
        - ConfigMap
        - Secret
    mutate:
      patchStrategicMerge:
        metadata:
          labels:
            color: blue
Apply the yaml file
kubectl apply -f labels.yaml
Then create a new pod and then see the details of that pod to see the newly created label.
kubectl run python --image=python
kubectl describe pod python
Example Four
To create a mutate policy of kind ClusterPolicy and add node-selector to pod resources and configure it with labels like color:blue
# addnodeselector.yaml
# Policy reference:https://kyverno.io/policies/other/add_nodeselector/add_nodeselector/

apiVersion: kyverno.io/v1
kind: ClusterPolicy
metadata:
  name: add-nodeselector
spec:
  rules:
  - name: add-nodeselector
    match:
      resources:
        kinds:
        - Pod
    # Adds the `nodeSelector` field to any Pod with two labels.
    mutate:
      patchStrategicMerge:
        spec:
          nodeSelector:
            color: blue
Apply the yaml file
kubectl apply -f addnodeselector.yaml
Then see the node selector by creating a new pod and see its details by using
kubectl run mysql --image=mysql
kubectl describe pod mysql
Conclusion
In this blog, we have seen the Kyverno policy engine and saw how to implement policies with it in a Kubernetes cluster.
