To understand different workload resources in Kubernetes
Kubernetes (K8s) is one of the popular open-source container orchestration systems for automating deployment, scaling, and management of containerized applications.
Kubernetes provides a basic resource called Pod. A pod is the smallest deployable unit in Kubernetes which has a collection of containers. As a pod can have one or more containers so different configurations can be passed to the container(s) using the pod’s configuration e.g. passing environment variables, mounting volumes, having health checks, etc.
In this blog, we will be going through three different ways to deploy applications (pods) on kind multi-node Kubernetes cluster using three different Kubernetes resources such as
- Configure a multi-node kind cluster with two worker and one master node.
kind create cluster --config=kind-config.yaml
It will take a few minutes to get the kind cluster configured and as it gets configured, the Ready status of nodes can be verified by
kubectl get nodes
In the NFS hands-on lab, we have seen how to set up ReadWriteMany access mode for persistent volume in a kind cluster as it comes with a standard storage class that has ReadWriteOnceaccess mode.
- Configure NFS storage class with
ReadWriteManyaccess-mode
kubectl apply -f setup_nfs.yaml
- Check the NFS storage class
kubectl get storageclass
For detailed differences between the three resources, we will be deploying a sample counter app, which logs and increments the count from a counter file like 1,2,3,….
For this, we will be using a counter file from a Persistent Volume to detail the differences between the Deployments, StatefulSets, and DaemonSets.
# counter-pvc.yaml
apiVersion: v1
kind: PersistentVolumeClaim
metadata:
  name: counter
spec:
  accessModes:
    - ReadWriteMany
  resources:
    requests:
      storage: 50Mi
  storageClassName: example-nfs
kubectl apply -f counter-pvc.yaml
Deployments
Deployment is the easiest and most used resource for deploying your application. It is a Kubernetes controller that matches the current state of your cluster to the desired state mentioned in the Deployment manifest.
For example, If you create a deployment with 1 replica, it will check that the desired state of ReplicaSet is 1 and current state is 0, so it will create a ReplicaSet, which will further create the pod.
If you create a deployment with name counter, it will create a ReplicaSet with name counter-<replica-set-id>, which will further create a Pod with name counter-<replica-set->-<pod-id>.
Deployments are usually used for stateless applications. However, you can save the state of deployment by attaching a Persistent Volume to it and making it stateful, but all the pods of deployment will be sharing the same Volume, and data across all of them will be the same which can lead to data inconsistency.
For deploying the sample counter app using a deployment, we will be using the following manifest
# counter-deployment.yaml
apiVersion: apps/v1
kind: Deployment
metadata:
  name: counter-deploy
spec:
  replicas: 1
  selector:
    matchLabels:
      app: counter
  template:
    metadata:
      labels:
        app: counter
    spec:
      containers:
      - name: counter
        image: "kahootali/counter:1.1"
        volumeMounts:
        - name: counter
          mountPath: /app/
      volumes:
      - name: counter
        persistentVolumeClaim:
          claimName: counter
kubectl apply -f counter-deployment.yaml
kubectl get pods -o wide
kubectl logs -l app=counter

Now if you scale up the deployment to 3 by running
kubectl scale deployment counter-deploy --replicas=3
As a new pods gets created, if we check the logs of the new pods, their logs will not start from 1 and the counter index be would random. This is because pods in the deployment are sharing the same volume, and data is shared across all the pods.
kubectl get pods -o wide
kubectl logs <pod_name>
Also if we check the Persistent Volume Claim(PVC), only one PVC will be created that both the pods will be sharing so it can cause Data Inconsistency.
kubectl get pvc

Deployments create a ReplicaSet which then creates a Pod so whenever you update the deployment using RollingUpdate(default) strategy, a new ReplicaSet is created and the Deployment moves the Pods from the old ReplicaSet to the new one at a controlled rate.
Rolling Update means that the previous ReplicaSet doesn’t scale to 0 unless the new ReplicaSet is up & running ensuring 100% uptime. If an error occurs while updating, the new ReplicaSet will never be in Ready state, so the old ReplicaSet will not terminate again ensuring 100% uptime in case of a failed update. In Deployments, you can also manually roll back to a previous ReplicaSet, if needed in case your new feature is not working as expected.
Let’s remove the Deployment Object
kubectl delete deployment counter-deploy
StatefulSets
StatefulSet is a Kubernetes resource used to manage stateful applications. It manages the deployment and scaling of a set of Pods and provides the guarantee about the ordering and uniqueness of these Pods.
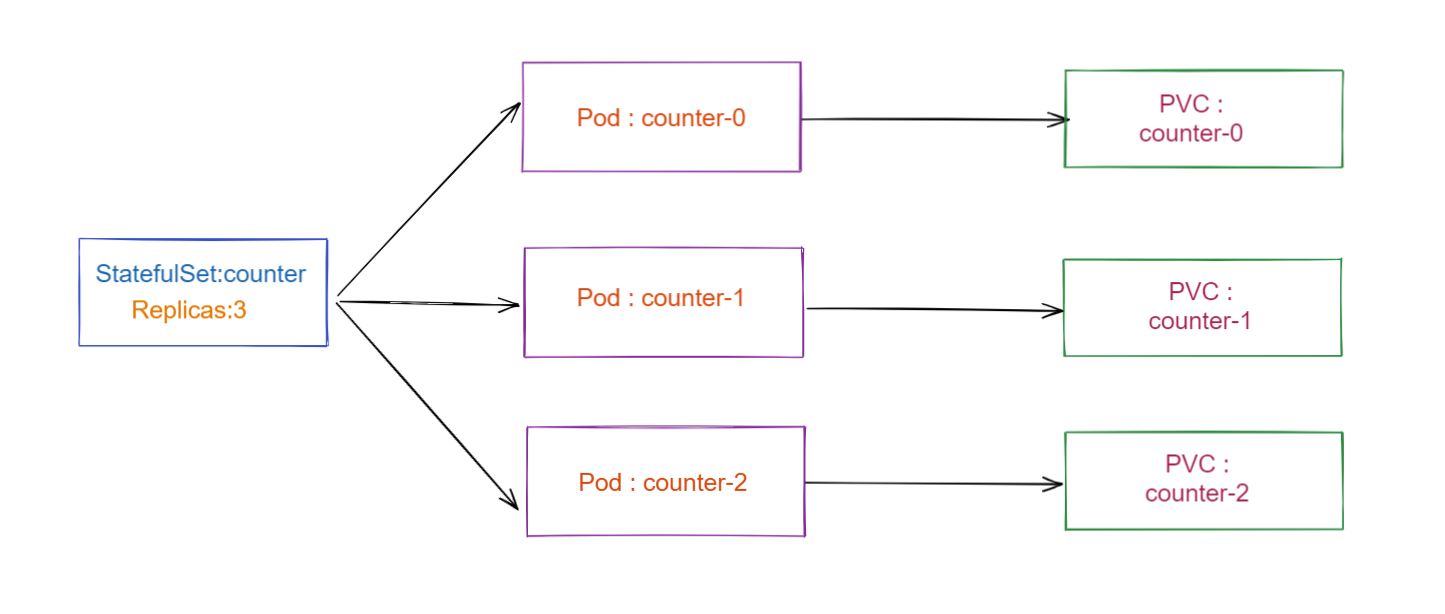
StatefulSet is also a Controller but unlike Deployments, it doesn’t create ReplicaSet rather itself but creates the Pod with a unique naming convention. e.g. If you create a StatefulSet with name counter, it will create a pod with name counter-0, and for multiple replicas of a stateful set, their names will increment like counter-0, counter-1, counter-2, etc
Every replica of a stateful set will have its own state, and each of the pods will be creating its own PVC(Persistent Volume Claim).
For deploying the sample counter app using a stateful set, we will be using the following manifest
# counter-statefulset.yaml
apiVersion: apps/v1
kind: StatefulSet
metadata:
  name: counter
spec:
  serviceName: "counter-app"
  selector:
    matchLabels:
      app: counter
  replicas: 1
  template:
    metadata:
      labels:
        app: counter
    spec:
      containers:
      - name: counter
        image: "kahootali/counter:1.1"
        volumeMounts:
        - name: counter
          mountPath: /app/
  volumeClaimTemplates:
  - metadata:
      name: counter
    spec:
      accessModes:
        - ReadWriteMany
      storageClassName: example-nfs
      resources:
        requests:
          storage: 1Mi
kubectl apply -f counter-statefulset.yaml
kubectl get pods -o wide
kubectl logs counter-0
Now if you scale up the stateful set to 3 replicas by running
kubectl scale statefulsets counter --replicas=3
kubectl get pods -o wide
It will first create a new pod, and once that pod is ready, then another pod counter-2will be created. The new pods will have their own volume and if you check the logs, the count will again start from 1 for the new pods, unlike in Deployments.
kubectl logs counter-1
kubectl logs counter-2
Also if we check the Persistent Volume Claim(PVC) once again then there will be three PVCs that will be created.
kubectl get pvc
StatefulSets don’t create ReplicaSet so you cant roll back a StatefulSet to a previous version. You can only delete or scale up/down the Statefulset. If you update a StatefulSet, it also performs RollingUpdate i.e. one replica pod will go down and the updated pod will come up.
StatefulSets are useful in the case of Databases especially when we need Highly Available Databases in production as we create a cluster of Database replicas with one being the primary replica and others being the secondary replicas. The primary will be responsible for read/write operations and secondary for read-only operations and they will be syncing data with the primary one.
Let’s remove the StatefuleSet Object
kubectl delete statefulset counter
DaemonSet
A DaemonSet is a controller that ensures that the pod runs on all the nodes of the cluster. If a node is added/removed from a cluster, DaemonSet automatically adds/deletes the pod.
Some typical use cases of a DaemonSet is to run cluster level applications like:
- Monitoring Exporters: You would want to monitor all the nodes of your cluster so you will need to run a monitor on all the nodes of the cluster like NodeExporter.
- Logs Collection Daemon: You would want to export logs from all nodes so you would need a DaemonSet of log collector like Fluentd to export logs from all your nodes.
However, Daemonset automatically doesn’t run on nodes that have a taint e.g. Master. You will have to specify the tolerations for it on the pod.
Taints are a way of telling the nodes to repel the pods i.e. no pods will be scheduled on this node unless the pod tolerates the node with the same toleration. The master node is already tainted by:
taints:
  - effect: NoSchedule
    key: node-role.kubernetes.io/master
This means it will repel all pods that do not tolerate this taint. So for DaemonSet to run on all nodes, you would have to add the following tolerations on DaemonSet which means that it should tolerate all nodes.
spec:
      tolerations:
      - effect: NoSchedule
        operator: Exists
For deploying the sample counter app using a DaemonSet, we will be using the following manifest.
# counter-daemonset.yaml
apiVersion: apps/v1
kind: DaemonSet
metadata:
  name: counter-app
spec:
  selector:
    matchLabels:
      app: counter
  template:
    metadata:
      name: counter-app
      labels:
        app: counter
    spec:
      tolerations:
      - effect: NoSchedule
        operator: Exists
      containers:
      - name: counter
        image: "kahootali/counter:1.1"
        volumeMounts:
        - name: counter
          mountPath: /app/
      volumes:
      - name: counter
        persistentVolumeClaim:
          claimName: counter
When DaemonSet is deployed, it will create pods equal to the number of nodes. In terms of behavior, it will behave the same as Deployments i.e. all pods will share the same Persistent Volume.
kubectl apply -f counter-daemonset.yaml
kubectl get pods -o wide
kubectl logs <counter-podname>
Ongoing through the logs of a pod of DaemonSet, one can observe that the logs are not in order, meaning that all pods are sharing the same volume. Also, only one PVC will be created that all pods will be sharing.
kubectl get pvc

If you update a DaemonSet, it also performs RollingUpdate i.e. one pod will go down and the updated pod will come up. If an error occurs while updating, so only one pod will be down, all other pods will still be up, running on the previous stable version. Unlike Deployments, you cannot roll back your DaemonSet to a previous version.
Let’s remove the DaemonSet Object
kubectl delete daemonset counter-app
Conclusion
In this blog, we have seen different ways to deploy pods with the help of different Kubernetes resources.
