To know about the concept of Linux’s OOMKilled and how it helps Kubernetes to define a Quality of Service (QoS) class for its pods.
Most Kubernetes users would have encountered OOMKilled at least once. When OOMKilled occurs, we tend to recalibrate the pod’s QoS or move the pod to a different node thinking there is a memory issue with the node. In this Kubernetes Tip, we will dig deep into an interesting aspect of OOMKilled that would help us to configure Pod QoS better.
What is OOMKilled
OOMKilled is not part of Kubernetes but is actually a part of linux kernel. This process continuously monitors the node memory to determine memory exhaustion. If OOM Killer detects such exhaustion, will choose to kill the best process(es).
To identify the “Best Process” to be killed, following points are kept in mind :
- Kill least number of processes to minimize the damage in terms of stability & importance of the system.
- Killing those processes should fetch maximum freed memory for the node.
To facilitate this, the kernel maintains oom_score for each process. The higher the value of oom_score the bigger the chances of that process getting killed by OOM Killer. The kernel also provides flexibility for the user process to adjust oom_score using oom_score_adj value.
Quality of Service in Kubernetes
QoS or Quality of Service is concept in which Kubernetes uses “Pod Classes” and the scheduler governs the scheduling and removal priority of pods according to these Pod classes.
QoS class can be set by changing resource requests and limits definitions.
To know further about QoS classes we have to first know about “request” and “limit” concept which is used for assigning CPU and memory resources.
The “request” keyword is used to denote the minimum guaranteed resources which are assigned to a Pod.
The “limit” keyword shows the maximum limit of resources that the pod can use.
By setting these request and limit parameter the pod can be divided to 3 different QoS classes:
- BestEffort
- Burstable
- Guaranteed
Kubernetes Configures oom_score_adj.
Kubernetes takes advantage of oom_score_adj by configuring different values for the different Quality of Service (QoS). The value configured are as below :

It can be inferred that BestEffort Pods gets affected first while Guaranteed Pods is affected last by the oom_killer when there is memory exhaustion on the node.
Lab with OOM Score of Pods with QoS
You can start the lab setup by clicking on the Lab Setup button on the right side of the screen. Please note that there are app-specific URLs exposed specifically for the hands-on lab purpose.
Our lab has been set up with all necessary tools like base OS (Ubuntu), developer tools like Git, Vim, wget, and others.
In this lab we will observe how Out of memory errors works by creating a simulated environment where excessive memory exhaustion takes place.
Create deployment for Pod with QoS class of Guaranteed
For creating a Guaranteed Pod, following points must be kept in mind.
- Every Container in the Pod must have a memory and CPU limit along with a memory and CPU request.
- For every Container in the Pod, the memory limit and the CPU limit must be equal to the memory and CPU request
# guaranteed.yaml
apiVersion: v1
kind: Pod
metadata:
  name: guaranteed-pod
spec:
  containers:
  - name: guaranteed-pod
    image: nginx
    resources:
      limits:
        memory: "200Mi"
        cpu: "700m"
      requests:
        memory: "200Mi"
        cpu: "700m"
    command: ["/bin/sh", "-c"]
    args:
    -  apt update;
       apt install stress;
       stress --vm 1 --vm-bytes 150M --vm-hang 1
Here, the pod requests for Memory and CPU Resources. Note that the Request and Limit Resources are equal.
Apply the deployment for guaranteed pod.
kubectl apply -f guaranteed.yaml
Check the Qos of Pod:
kubectl get pod guaranteed-pod --output=yaml | grep qosClass
Create deployment for Pod with QoS class of Burstable
For creating a Burstable Pod, following points must be kept in mind.
- The Pod does not meet the criteria for QoS class Guaranteed.
- At least one Container in the Pod has a memory or CPU request or limit.
# burstable.yaml
apiVersion: v1
kind: Pod
metadata:
  name: burstable-pod
spec:
  containers:
  - name: burstable-pod
    image: nginx
    resources:
      limits:
        memory: "300Mi"
      requests:
        memory: "200Mi"
    command: ["/bin/sh", "-c"]
    args:
    -  apt update;
       apt install stress;
       stress --vm 1 --vm-bytes 150M --vm-hang 1
Here the Pod memory request is lower than the memory limit.
Apply the deployment for burstable pod.
kubectl apply -f burstable.yaml
Check the Qos of Pod:
kubectl get pod burstable-pod --output=yaml | grep qosClass
Create deployment for Pod with QoS class of BestEffort
For a Pod to be given a QoS class of BestEffort, the Containers in the Pod must not have any memory or CPU limits or requests.
# besteffort.yaml
apiVersion: v1
kind: Pod
metadata:
  name: besteffort-pod
spec:
  containers:
  - name: besteffort-pod
    image: nginx
    command: ["/bin/sh", "-c"]
    args:
    -  apt update;
       apt install stress;
       stress --vm 1 --vm-bytes 150M --vm-hang 1
Apply the deployment for bestEffort pod.
kubectl apply -f besteffort.yaml
Check the Qos of Pod:
kubectl get pod besteffort-pod --output=yaml | grep qosClass
OOM_Score according to Pod QoS
You can view the Pod oom_score which is defined according to the pod’s QoS class by the following method:
kubectl exec -it <pod-name> /bin/bash
cd /proc
cat <PID>/oom_score_adj
Here the PID is any one of the process directory found in /proc directory of Pod.

You can also notice that each pod executes a set of commands for doing a Stress operation.
apt update;
apt install stress;
stress --vm 1 --vm-bytes 150M --vm-hang 1
This is performed so that actual memory is being consumed by a pod which depicts the action of an actual memory consuming pod.
Watch the Status in new Tab
Keep monitoring the System Logs in a separate tab for any unusual activity.
Open another tab and apply the following command for SysLog status.
dmesg -Tw
Optional:
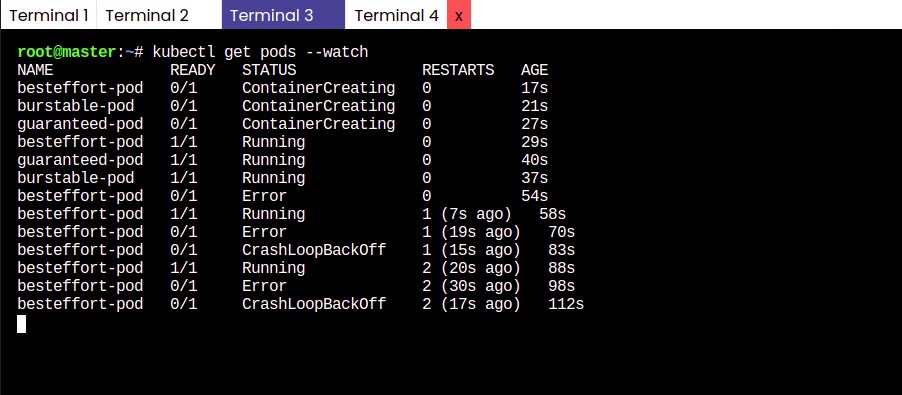
Create a watch mode in another tab for showing status of pods
kubectl get pods --watch
Start exhausting available memory
Now we will stress the remaining memory on our node (master), which the Kubernetes Cluster and our pods; using a simple Stress test.
apt install stress;
stress --vm 2 --vm-bytes 256M --timeout 90s
As soon as the test starts, you can start noticing an error in BestEffort-pod status (kubectl get pods), and it restarts again and again till the stress test is going on.
On observing the SysLog status tab it shows Out of Memory killed (OOM Killed).
This shows that the oom-killer is being invoked which kills the pod – process with the highest oom_score, which in this case is the process of the container in BestEffort Pod.

Error occurring in Pod Status.
When the process inside the container gets killed, then the container is restarted by its pod according to the restart policy.
kubectl get pod besteffort-pod --output=yaml | grep restartPolicy
Here the restart policy is set to always, which means the pod is always restarted instead of getting killed whenever it’s interrupted.
This default restart policy will eventually back off on restarting the pod if it restarts many times in a short time span thus we start getting CrashLoopBackOff.
Conclusion
In this blog, we saw how QoS tag is applied on a pod according to the priority of OOM Killer and how a Pod process is killed in a situation of Out of Memory.
