GitOps
As the name suggests with GitOps, we would want to manage our operations like application deployment, management, scaling etc via the Git. We can commit to the Git and our application/infrastructures get installed, updated etc. There are many tools which supports these like ArgoCD, Flux and many more. Here we’ll cover only ArgoCD. GitOps tools give us the following features:-
- Declarative
- Observability
- Auditability and Compliance
- Rollback
ArgoCD
ArgoCD is one of the project under ArgoProj, which has other projects like Argo Workflows, Argo Rollouts and Argo Events.
GitOps Workflow
Following is going to be our complete workflow
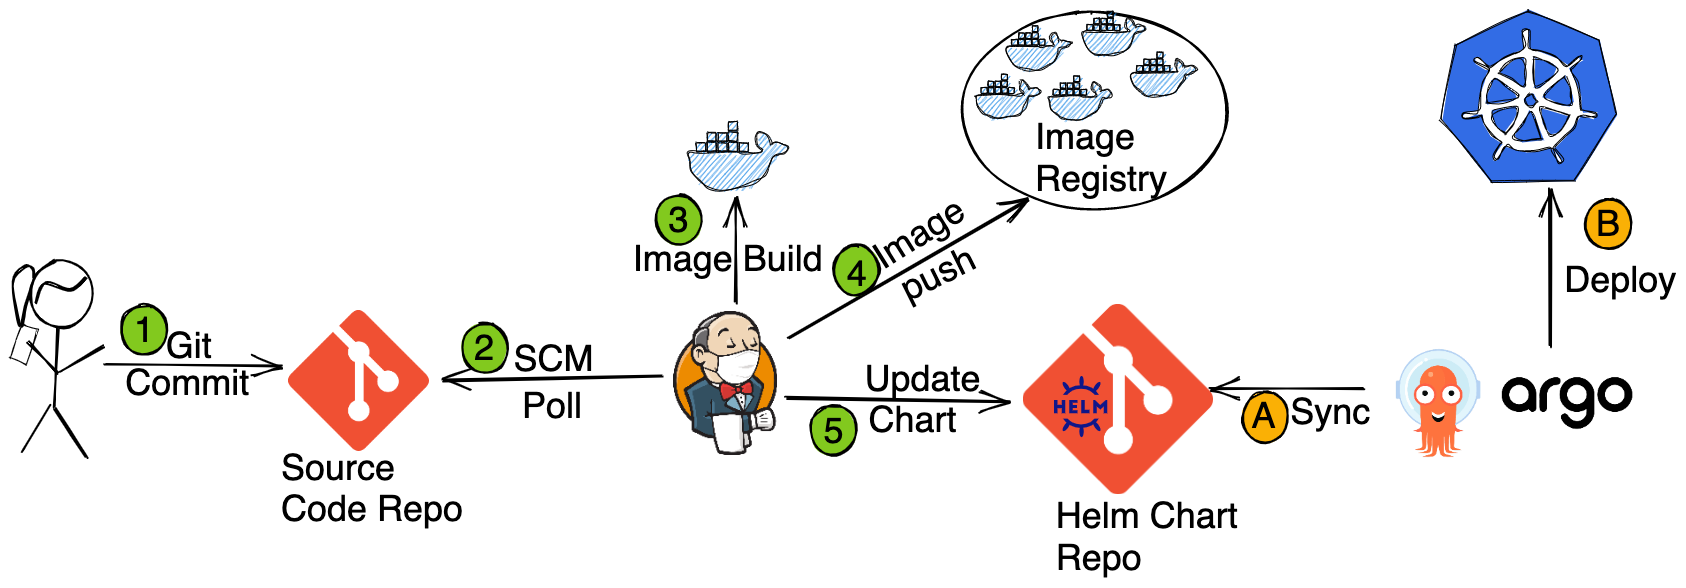
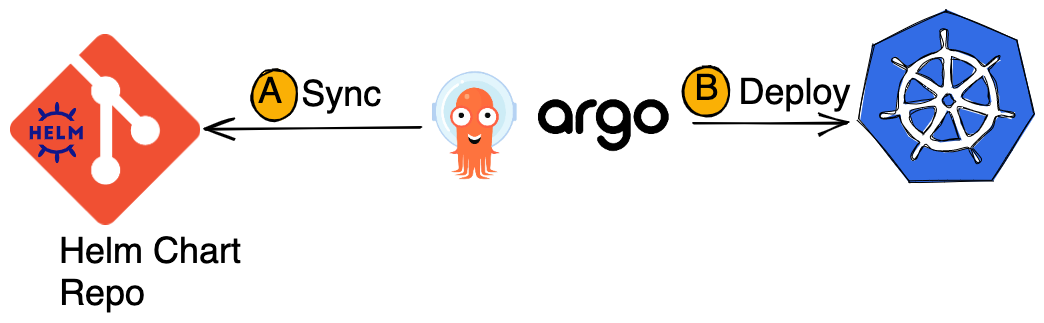
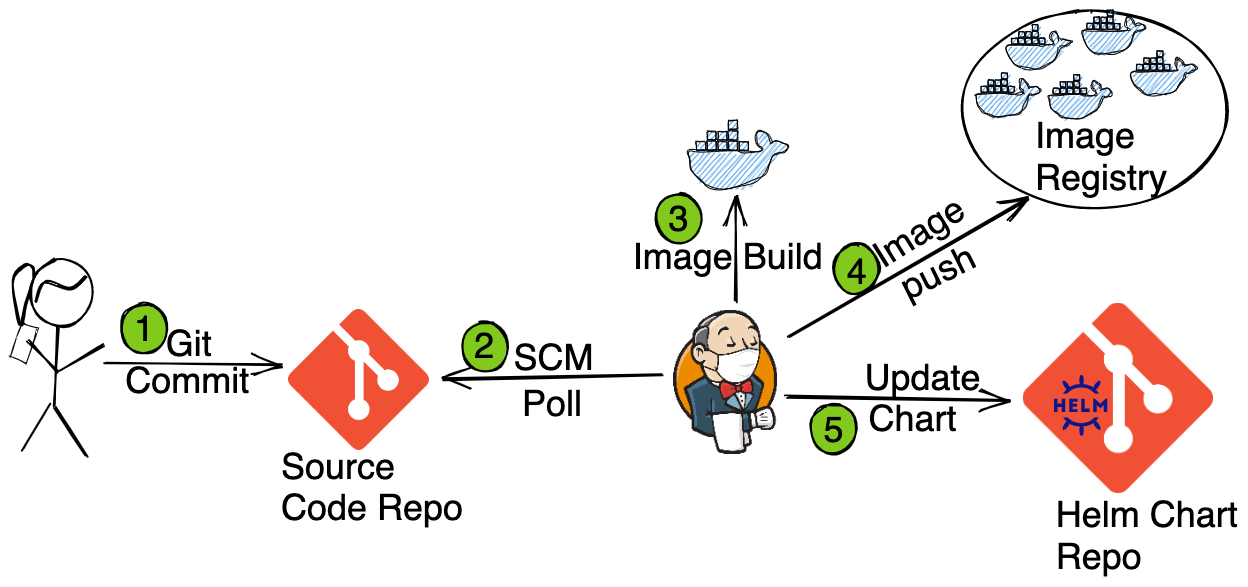
Which we’ll do in to parts. In first part, we’ll install the application with ArgoCD i.e. Steps A and B. In the second part we’ll configure the CI pipeline i.e. Steps 1 to 5.
Deploying Application with ArgoCD
Install ArgoCD
kubectl create ns argocd
kubectl apply -f argo-install.yaml -n argocd
kubectl get pods -n argocd
Once the Pods are for the ArgoCD, you can access its UI.
The default user is admin and to get the password, run the following command:-
kubectl -n argocd get secret argocd-initial-admin-secret -o jsonpath="{.data.password}" | base64 -dLogin to the ArgoCD UI and explore.
Fork the Helm Package Repo
https://github.com/cloudyuga/rsvpapp-helm-cicd
and use the forked repo to deploy the application via ArgoCD.
Create namespace app
kubectl create ns app
Steps for creating an application
- Login to
ArgoCD - Click on
new appand update like the following - Give an application name eg.
rsvpapp - Select the project. Since we haven’t created any new project yet, keep the project as
defaultwhich is automatically present after Argo CD installation.
Normally an application is installed inside a project. - Set SyncPolicy
Automatic - Enable
Prune Resourcesoption - Enable
SELF HEAL - Define the Source to set the repository for application configuration. Repository URL is the rollout-demo you forked eg:
https://github.com/<username>/rsvpapp-helm-cicd.git - Set Revision
HEAD - The path is the configuration file location. Here
. - Destination:
Destination is the cluster on which we are going to deploy the application - Select Cluster as
https://kubernetes.default.svc - Select the namespace (if any created) for deploying the application. Here we are using
appnamespace - Click on
create - On the application page, you can find the application name and its status as
Healthy and Synced - Click on the application name to get more details
Verify the application deployment
kubectl get pods,svc -n app
Also explore the ArgoCD UI.
Create the ingress for our deployment
apiVersion: networking.k8s.io/v1
kind: Ingress
metadata:
  name: rsvp-ingress
spec:
  rules:
  - http:
      paths:
      - path: /
        pathType: Prefix
        backend:
          service:
            name: rsvpapp
            port:
              number: 80
kubectl apply -f rsvp-ingress.yaml -n app
And access the application’s UI from the rsvpapp-ingress URL.
Configuring CI with Jenkins
Installing and Accessing Jenkins
sh jenkins-install.sh
Wait for sometime, till the pods of Jenkins and argocd are not up.
kubectl get pods -n jenkins
Now you can access the Jenkins UI. The default user is admin and to get the password, run the following command
kubectl exec --namespace jenkins -it svc/jenkins -c jenkins -- /bin/cat /run/secrets/additional/chart-admin-password && echo
Configure the GitHub and DockerHub Credentials with Jenkins for CI
During the CI process we will be uploading an image to DockerHub and updating a Git Repo. For that we’ll need to add the credentials inside Jenkins.
Create a DockerHub Credentials
Dockerhub credentials are required to upload the docker image from the Jenkins Pipeline to the docker-hub repository.
- Configure your GItHub credentials in Jenkins Dashboard –> Manage Jenkins –> Security –> Manage Credentials –> Global Credentials –>
Add Credentials - Scope:
Global - Username:
DOCKERHUB-USERNAME - Password:
DOCKERHUB-PASSWORD - id : dockerhub
- Description: NA
Create a Github Credential
Github credentials are required to make commits from the Jenkins Pipeline to Helm git repository.
- Configure your GItHub credentials in Jenkins Dashboard –> Manage Jenkins –> Security –> Manage Credentials –> Global Credentials ->
Add CredentialsCreate Github credentials - Scope:
Global - Username:
GITHUB-USERNAME - Password:
github's personal access token - id : github
- Description:
Fork the RSVPapp Source Code Repo and add CI Jenkinsfile
Fork the following application source code repo
https://github.com/cloudyuga/rsvpapp
and add following file "Jenkinsfile" at the root directory for the source code repository and commit.
pipeline {
    agent {
      kubernetes  {
            label 'jenkins-slave'
             defaultContainer 'jnlp'
      yaml """
apiVersion: v1
kind: Pod
spec:
  containers:
  - name: dind
    image: docker:18.09-dind
    securityContext:
      privileged: true
  - name: docker
    env:
    - name: DOCKER_HOST
      value: 127.0.0.1
    image: docker:18.09
    command:
    - cat
    tty: true
  - name: tools
    image: argoproj/argo-cd-ci-builder:v1.0.0
    command:
    - cat
    tty: true
"""
        }
    }
  environment {
      IMAGE_REPO = "<DOCKERHUB_USER>/rsvp"
      // Instead of DOCKERHUB_USER, use your Dockerhub name
  }
  stages {
    stage('Build') {
      environment {
        DOCKERHUB_CREDS = credentials('dockerhub')
      }
      steps {
        container('docker') {
          sh "echo ${env.GIT_COMMIT}"
          // Build new image
          sh "until docker container ls; do sleep 3; done && docker image build -t  ${env.IMAGE_REPO}:${env.GIT_COMMIT} ."
          // Publish new image
          sh "docker login --username $DOCKERHUB_CREDS_USR --password $DOCKERHUB_CREDS_PSW && docker image push ${env.IMAGE_REPO}:${env.GIT_COMMIT}"
        }
      }
    }
    stage('Deploy') {
      environment {
        GIT_CREDS = credentials('github')
        HELM_GIT_REPO_URL = "github.com/<GITHUB_USERNAME>/rsvpapp-helm-cicd.git"
        GIT_REPO_EMAIL = '<PUT_EMAIL_ID>'
        GIT_REPO_BRANCH = "master"

       // Update above variables with your user details
      }
      steps {
        container('tools') {
            sh "git clone https://${env.HELM_GIT_REPO_URL}"
            sh "git config --global user.email ${env.GIT_REPO_EMAIL}"
             // install wq
            sh "wget https://github.com/mikefarah/yq/releases/download/v4.9.6/yq_linux_amd64.tar.gz"
            sh "tar xvf yq_linux_amd64.tar.gz"
            sh "mv yq_linux_amd64 /usr/bin/yq"
            sh "git checkout -b master"
          dir("rsvpapp-helm-cicd") {
              sh "git checkout ${env.GIT_REPO_BRANCH}"
            //install done
            sh '''#!/bin/bash
              echo $GIT_REPO_EMAIL
              echo $GIT_COMMIT
              ls -lth
              yq eval '.image.repository = env(IMAGE_REPO)' -i values.yaml
              yq eval '.image.tag = env(GIT_COMMIT)' -i values.yaml
              cat values.yaml
              pwd
              git add values.yaml
              git commit -m 'Triggered Build'
              git push https://$GIT_CREDS_USR:$GIT_CREDS_PSW@github.com/$GIT_CREDS_USR/rsvpapp-helm-cicd.git
            '''
          }
        }
      }
    }
  }
}
Update the following details like following in the Jenkinsfile, as per your username and email id
- IMAGE_REPO = “nkhare/rsvpapp” (Your user-name)
- HELM_GIT_REPO_URL = “https://github.com/nkhare/rsvpapp-helm-cicd.git” (Your user-name)
- GIT_REPO_EMAIL = ‘
neependra.khare@gmail.com‘ (Your email-id)
The Jenkinsfile consists of following these stages
Build: This stage builds the new image after commit.Deploy: This stage updates the image name and tag in the Helm repository.
using which we’ll create the container image and update the Helm Chart accordingly.
Setting up Jenkins Pipeline
Create a Pipeline Job and link it with our source-code repository
- In the Jenkins dashboard, click on the new item, give a name to the item and select type as
pipelineClick ‘ok’
Build trigger Configuration
- Select
Poll SCMand add the schedule as*/1 * * * *
With above configuration, we’ll sync our source code SCM at every minute for the change.
Pipeline Trigger configuration
- Select definition as
Pipeline script from SCM - Select SCM as
Git - Give your
Git Hub Source Repository URL(https://github.com/<USERNAME>/rsvpapp) - Give script path as
Jenkinsfile - Save and Apply
Updating the Source Code Repos
Next we’ll make some changes our application’s frontend code and then check it the CI is triggered or not.
Check whether the build is successful or not
- Go to
Jenkins Dashboard - Click on your
Jenkins Job - Check Whether the build is successful or not
Verify the image in Docker hub
- Go to the
docker hub - Verify the new image is uploaded or not
Verify the Values in Helm repository
- Go to the Helm Chart Git repository
- Check the
values.yaml,which should be updated with the latestcontainer imageandtag
Once the CI workflow is over, which updates the Helm Repository; ArgoCD would automatically sync to it and deploy the new version of the app.
Check the Argocd Dashboard
- We can see a
new versionof the rollout for our application
Access the Deployment using UI
- Click on the
rsvpapp-ingressURL. under theLab URLs. - New UI changes would be reflected there.
That’s it and our CI/CD with Jenkins and ArgoCD is complete !!!
Conclusion
In the hands-on lab, we configured a complete CI/CD pipeline with Jenkins and ArgoCD. This should give you a good head start in the GitOps.
